

Seasonal recipes from professional cake-maker Edwina McNulty
I’M definitely guilty of getting caught up in the fervour of Christmas shopping. So much so that last year I bought a ludicrously tacky Santa Claus toilet seat cover with bells on it.
The festive season has become so commercialised, often we end up impulse-buying presents that with hindsight can seem token and meaningless, when really we just want to show our loved ones that we care.
For me, the festive season is about celebrating with our nearest and dearest, and it just wouldn’t be Christmas if we weren’t making and eating delicious food together. Christmas is created in the kitchen, and making gifts exemplifies what really matters at this time of year. What better way to express sentiments to someone you care for, than to present them with a gift that you’ve spent time and effort creating, and which tastes delicious too.
As a mother who works with sugar every day, I’ve found that there isn’t much that children find more enjoyable than creating edible treats. When Holly and Charlie’s little friends come to visit they materialise at the side of my workstation, silently watching me making chocolates and macarons and invariably a small hand will reach out and ask if they can help. Cooking with the children is a fun and bonding activity, and really encourages their creativity.
These recipes have been chosen because they are simple and fun to make, they keep well and taste delicious too. They’ll imbue your house with festive scents and warmth, and the children will love making and presenting these. Who wouldn’t rather receive a gift that a child has made themselves over something chosen out of a shop? A hand-made present feels like it has added meaning to it, and the appreciation that the children will receive for their loving efforts is what Christmas is all about.
Hygge gingerbread cookies
Based on the traditional Scandinavian Pepparkarkor recipe, this strong ginger dough can withstand a lot of kneading, making it perfect for baking with children. Chilling the dough helps prevent the cookies from cracking, however if the wee ones can’t wait that long then they’ll still taste just as delicious. These cookies are perfect for hanging on the tree, though I can’t guarantee they’ll last until Christmas Day!
Ingredients
80g light brown sugar
2 tablespoons honey
1 tablespoon black treacle
1 teaspoon ground cinnamon
1 tablespoon ground ginger
½ teaspoon ground cardamom
Zest of one orange
95g butter (block, not spread)
½ teaspoon bicarbonate of soda
225g plain flour, sifted
1 tablespoon milk
Edible silver leaf on transfer sheets (not loose silver leaf)
Cream all the ingredients except the flour and bicarb in the mixer. You’ll need to scrape around the sides a few times to incorporate everything. Add the flour and the bicarbonate of soda, and start to mix everything together by hand. Add the milk to bring the mixture together, if it is still a little crumbly add a little more milk until it just bonds. Wrap the dough in clingfilm and chill in the fridge for an hour.
Preheat the oven to 180C, gas mark 4. Cover two baking sheets with non-stick paper.
Roll out the mixture on a floured surface until it is 3mm thick. Cut out the shapes with your desired cookie cutter, then place on the sheet. Use a cocktail stick to make a little hole where you want to thread through the twine to hang the cookies from the tree.
Bake in the oven for around 12 minutes, then place on a wire rack to cool.
Once cooled, rub a little water over the cookie with your finger. Take a silver leaf sheet, press it on the cookie and rub it all over until you have lots of little twinkly shards of silver.
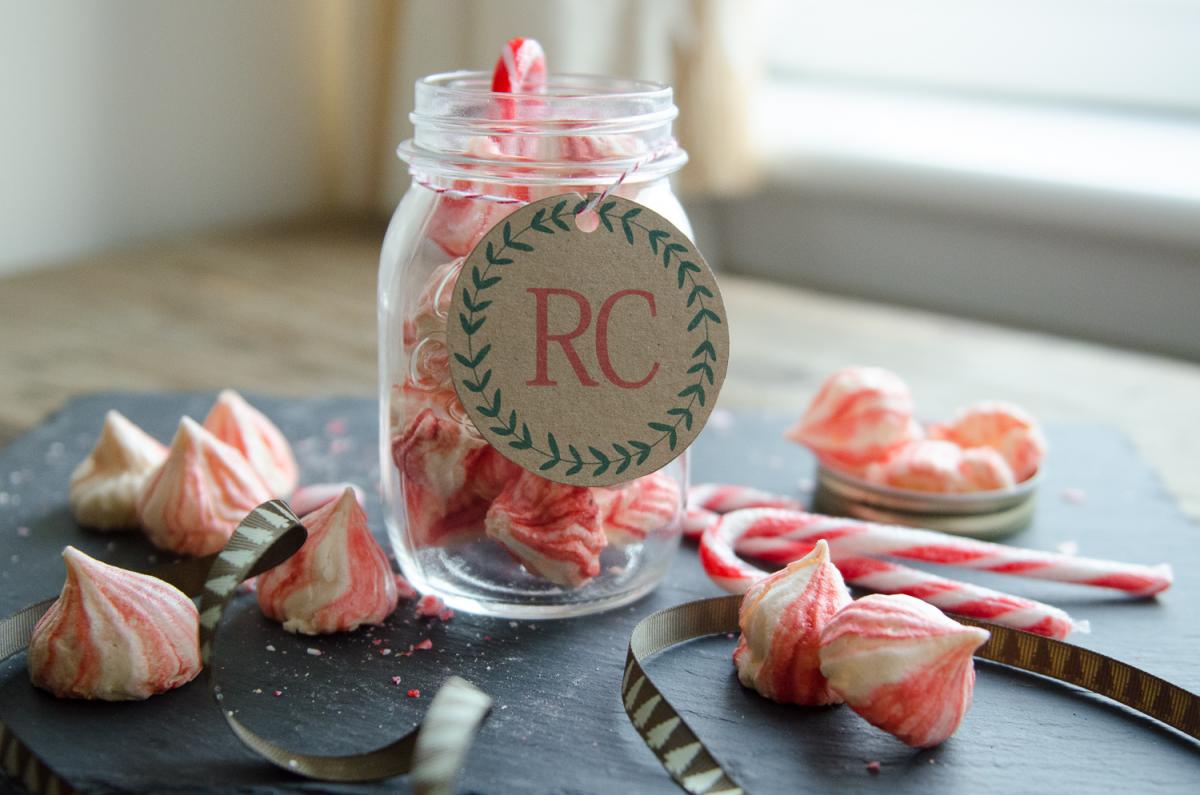
Candy cane meringue kisses
Children will have so much fun piping out the pretty patterned mixture, and they can get creative and mix all sorts of colours and flavourings through it. You’ll know when the mixture is ready to put in the piping bag when the glossy peaks of meringue are so stiff that you can challenge the kids to the risky business of holding the bowl above your head without any of the mixture falling out! Alternatively, the safer method of checking this is to turn the whisk upside down.
Ingredients
3 egg whites
75g caster sugar
Red gel colour (I use Sugarflair Red Extra)
¼ teaspoon peppermint extract
Line two baking sheets with baking parchment, and preheat the oven to 120C, gas mark 1/2. Insert a nozzle into a piping bag (I used a Wilton 32 nozzle, 8mm width) then use the end of a sharp knife to paint five or six red lines the bag with the gel, from the nozzle to around ¾ down the bag.
Start by whisking the egg whites until stiff, then add the sugar slowly, a third at a time, along with the peppermint extract. Whisk until you have stiff, glossy white peaks.
Carefully spoon the mixture into the piping bag, taking care not to dislodge the red stripes. It won’t be a disaster if the colour moves, you’ll just end up with pink striped meringues.
Hold the bag vertically over the tray, squeeze the bag as you move it in a circle and over itself, then as you move the bag away release the pressure to form a little peak. I aimed to have the meringues around 1.5 inches wide.
Bake the meringues for around an hour, they should be crispy on the outside and a little chewy inside.
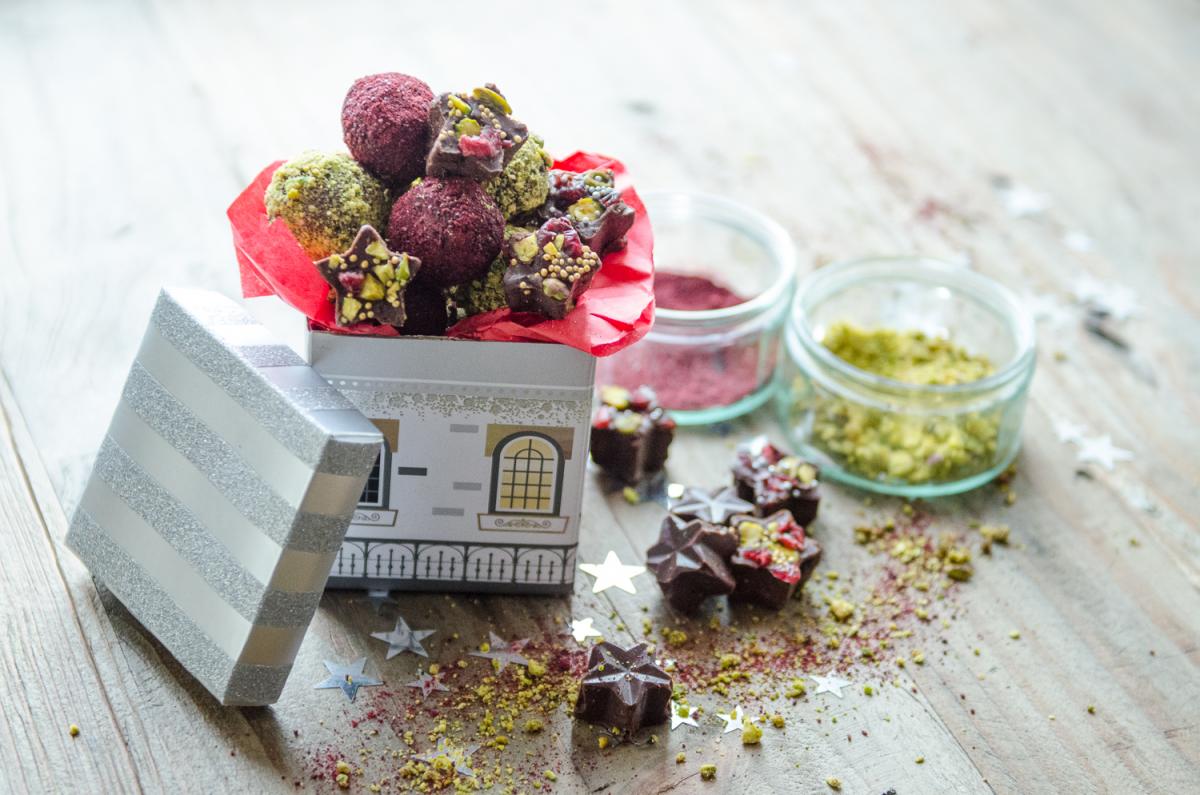
Sour cherry and pistachio truffles
Silicone ice cube trays are very effectively used as chocolate moulds, giving a good shape and making it easy for the chocolates to pop out once they’re set. I’ve chosen vivid green pistachios and the bright red cherry powder as they are so appropriately festive, though you can use cocoa powder, crushed biscuits, or even skewer the chilled truffle and dip it in melted chocolate for a harder shell. Messy, chocolatey hands are inevitable here: if anything it just makes it all the more enjoyable for the little ones.
Ingredients
300g dark chocolate with at least 50% cocoa solids
60ml double cream
80 g sour cherry conserve (the tarter the conserve the better the flavour with the chocolate)
Freeze-dried cherry powder
Crushed pistachios
Tiny gold and silver pearls
Break the chocolate into small chunks, place in a microwaveable bowl, pour the cream over and cook on a medium heat in 30-second bursts to make a smooth chocolate ganache. Every 30 seconds, remove and stir, to ensure the chocolate doesn’t burn. Once it’s all melted and glossy, stir in the conserve. Pour some of it into the ice cube tray, smoothing off the top with a knife so the chocolates are nice and neat. Sprinkle your pistachios and edible pearls over the top, then put in the fridge to set overnight.
To make the truffles with the remainder of the ganache, you need to leave it until it’s set, for at least four hours or overnight.
Once the ganache is firm (it will still be relatively soft and malleable) take a walnut-sized lump, roll it between the palms of your hands to shape a ball. Roll this in your desired coatings until the chocolate is completely covered.
A life in cakes: about the author
COMING from a French-Italian family where many of my relatives are chefs, I had a life-long obsession with cooking, but I’d never explored making a living from my passion. I’d always worked in HR (human resources), though since having the children I had begun to question the direction my life was heading in. My job required such a high commitment, working long hours where there were days when I wouldn’t see the children at all. I was living to work, instead of spending time with the people that mattered the most to me.
The seed was planted when I was planning my own wedding. I wanted a show-stopping, centrepiece wedding cake, but couldn’t find one that I liked. I decided to make my own, and realised there was room for a new wedding cake company. I began some intensive training and spent months perfecting recipes to create a collection of luxury cake designs.
I launched Rosewood Cakes full-time in January 2015, with the aim of creating sensational wedding cakes that taste as good as they look. The business quickly gained a good reputation and my husband Chris came on board to run the company with me. We found couples loved the elongated silhouettes, the sugar flowers and the detail work. But what really appeals is the range of flavours on offer – from white chocolate and passion fruit to sticky toffee and salted caramel to earl grey and violet. Food is love and central to a celebration.
For more information on Rosewood Wedding Cakes, visit http://www.rosewoodcakes.com/


Why are you making commenting on The Herald only available to subscribers?
It should have been a safe space for informed debate, somewhere for readers to discuss issues around the biggest stories of the day, but all too often the below the line comments on most websites have become bogged down by off-topic discussions and abuse.
heraldscotland.com is tackling this problem by allowing only subscribers to comment.
We are doing this to improve the experience for our loyal readers and we believe it will reduce the ability of trolls and troublemakers, who occasionally find their way onto our site, to abuse our journalists and readers. We also hope it will help the comments section fulfil its promise as a part of Scotland's conversation with itself.
We are lucky at The Herald. We are read by an informed, educated readership who can add their knowledge and insights to our stories.
That is invaluable.
We are making the subscriber-only change to support our valued readers, who tell us they don't want the site cluttered up with irrelevant comments, untruths and abuse.
In the past, the journalist’s job was to collect and distribute information to the audience. Technology means that readers can shape a discussion. We look forward to hearing from you on heraldscotland.com
Comments & Moderation
Readers’ comments: You are personally liable for the content of any comments you upload to this website, so please act responsibly. We do not pre-moderate or monitor readers’ comments appearing on our websites, but we do post-moderate in response to complaints we receive or otherwise when a potential problem comes to our attention. You can make a complaint by using the ‘report this post’ link . We may then apply our discretion under the user terms to amend or delete comments.
Post moderation is undertaken full-time 9am-6pm on weekdays, and on a part-time basis outwith those hours.
Read the rules here